Quilting Supplies at Craftsy.com
11-10-2018

Layer Cake Quilts- Origami Squares

I have a fabulous finish for you guys today!

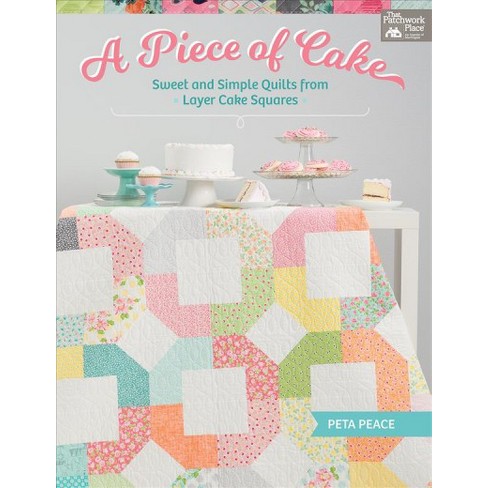
This quilt is from a book dedicated to all things layer cake!

Image result for peta peace layer cake

A Piece of Cake

Sweet and Simple Quilts from Layer Cake Squares

by Peta Peace

We all know we have at least 10 layer cakes piled up waiting for some inspiration….

pattern: “Origami Squares”

I just loved this pattern because it only required one layer cake.

Now… I made this layer cake myself because I wanted these specific colors.

I’m dying to try it again!


I used an all over stipple pattern for quilting and a zig zag stitch to finish off my binding.

And it wouldn’t be finished unless it has a label!

So I added my pre-made labels from ikaprint.com. Love these!

So if you have some layer cakes you wanna dive into… check out this book:

A Piece of Cake

Sweet and Simple Quilts from Layer Cake Squares

by Peta Peace

Leave a comment telling me how many layer cakes you have stored up in your sewing room:)

(I have 20 something! Yikes)


Keep it Sassy♥

You can find and follow TheSassyQuilter  on Facebook, Pinterest, Bloglovin’, Instagram, Twitter or by email updates(form on right sidebar)!

Share Button
07-11-2014

Memory Quilts

memoryquilt3

Memory Quilts

I am working on another memory quilt for a special someone at my church. Her daughter approached me and asked if I could do this project AND keep it a secret.  She handed over a grocery bag full of clothes and to be honest I was a little nervous to peek inside. You never know what you are gonna get!

memoryquilt2

I was pleasantly surprised! Lots of cotton shirts and after inspecting a little closer I realized they were all handmade. Lots of really unique prints and well made at that(umm, look at these cute hot air balloons!). Wonder how she decided what pattern she would sew? or did she just make up her own?

memoryquilt4

The details like these handmade button holes give you a look back at the history of sewing and clothes making and a glance into this persons life.

memory_quilt5

This one has been mended a few times and buttons replaced. It made me think back to a different time when we made due what we had and actually fixed things when they were broken. Things were handmade and appreciated more because of that.  This is one reason I love quilts so much! We take pieces of ourselves and put them into our quilts and give them to others….so personal, our way of showing others that they matter! We might not admit it out loud, but we secretly want our quilts to be loved and appreciated so we too can feel like we matter.  I hope to put all of the memories of the woman who made these shirts into this quilt and show how much she mattered. You can buy a quilt for just $20-$30, but you only are given one if someone loves you!

Quilts matter:)

Keep it Sassy

You can find and follow TheSassyQuilter  on Facebook, Pinterest, Bloglovin’, Instagram, Twitter or by email updates(form on right sidebar)!

Share Button
07-08-2014

Aviatrix Medallion- Center Complete

aviatrix_medallion_center

Aviatrix Medallion

I was so excited this weekend to have some vacation time so I could finish the cutting for my Aviatrix Medallion Quilt! It is a pretty busy pattern so there is plenty of cutting to do and I usually like to do all the cutting first. Then I feel like I’m ready to roll!

Do you do all your cutting first or cut as you go?

aviatrix_medallion_cutting

I love using these Sterlite containers for keeping my active projects together and they are easy to grab and go if I want to work on it at a friends house or at my guild. You can find these at Dollar General Stores.

project_container

They have nice locking handles and stack well….no sliding around. Yeah, I have probably have too many of these!

aviatrix_medallion_center1

Look at the back of this thing…..so many seams! The pattern recommended pressing open and it definitely helped to keep everything laying flat. I have never sewn diamonds together before. Let me say pinning was a MUST! The diamonds are small and stretchy from bias edges. Pinning and some starching really made the difference.

My Aviatrix Medallion is part of a quilt along and pattern by Elizabeth Hartman. Here is her beautiful quilt.

aviatrix medallion quilt

Aviatrix Medallion Quilt by Elizabeth Hartman

See, I told you it was lots of cutting:) I tried to mix it up a bit by switching up my background fabrics. Hope this comes out how I imagined it:) If you want to see lots of different versions coming together, check out #aviatrixmedallion on Instagram.

Now on to Border 1!

Keep it Sassy

You can find and follow TheSassyQuilter  on Facebook, Pinterest, Bloglovin’, Instagram, Twitter or by email updates(form on right sidebar)!
Share Button
06-25-2014

Crackerjack Quilt and Giveaway!

Crackerjack_Quilt

Crackerjack

Pattern by Swirly Girls Design

This Crackerjack quilt was such a fun and quick quilt to make! It is one of the Swirly Girls Design-Dashing Bobbin Series patterns.

These are made to be quick piece patterns and they don’t break the bank! Best part…..it only takes 10 Fat Quarters and some background fabric….love that.

crackerjack_quilt3

crackerjack_quilt1

I am so in love with this black pin dot I used for the background! I could use an entire bolt of this…..the only place I could find it was at a big box store**gasp**, so I am not sure what the name of it was.

The blocks are made from Daydream in Jewel by Swirly Girls Design for Michael Miller Fabrics.

crackerjack_quilt4

I quilted this in an all over meander or stipple design using a 50wt. Aurifil 100%cotton in white. This actually blended a little too well! I could barely see where I had quilted ….BONUS>>> you can’t see if I made any mistakes, Lol:)

Here is the back…

crackerjack_quiltback

I decided to use a different color within the blocks. I went with a teal 50wt. Aurifil 100% cotton. I thought the white was just too stark inside the block.

crackerjack_quiltback2

You can see the teal did not have too much contrast on the back so I was happy with it. It can get tricky finding threads that blend on both sides. I’m just now noticing the random thread on the loose…we all have those:)

Wondered how it would look if I did the whole quilt in this color???

crackerjack_quilt_label

I used my handy personal quilt labels that you can have made HERE. These are awesome and cheap!

Don’t ask me why I decided to use the teal thread on the binding, you always want to draw attention to your binding……right! Not.

I used THIS machine binding tutorial.

crackerjack_quilt5


*********************

Because you guys are so awesome….I have an awesome GIVEAWAY for you today!

Fort Worth Fabric Studio    

Fort Worth Fabric Studio has created a lovely bundle for this quilt…

and Swirly Girls Design is throwing in a FREE pattern!

Crackerjack_bundle

You can purchase this bundle HERE if you just can’t wait!

You can also get the pattern HERE over at FWFS.

If you buy this pattern now and win the giveaway, I can swap out a different one!

To enter the GIVEAWAY:

Leave a comment below telling me how you follow The Sassy Quilter, so that’s up to six chances! Do as many or as few as you like.

(giveaway open thru July 2nd and open internationally)

Thanks you guys for all your support and good luck!


Keep it Sassy

You can find and follow TheSassyQuilter  on Facebook, Pinterest, Bloglovin’, Instagram, Twitter or by email updates(form on right sidebar)!

Share Button
05-29-2014

Paper Doll Dress-Up!

My Quilt Infatuation

Do you follow Kelly over at My Quilt Infatuation?

Well, guess what…..She has a gorgeous new pattern for you guys called Paper Doll Dress-Up! Kelly is just the sweetest and I had a blast testing out this super cute pattern for her.

Quilting: Paper Doll Dress-Up

She is giving away 3 FREE PATTERNS, so click HERE to jump over and get your name in the drawing!

If you just can’t wait, you can purchase this pattern in Kelly’s Etsy Shop or in Craftsy’s pattern store.

Here is my top, fresh off the machine:

paperdoll_dressup_top

paperdoll_dressup_top1

I used a stack of Riley Blake FQ’s in Summer Song and Rainy days and Mondays. I have been staring at these two bundles for 2 years! Feels so good to actually use some of my older fabric:) Can’t wait to get this one quilted!

Good Luck in the drawing! and check out the rest of Kelly’s blog. She just finished a beautiful quilt called Absolutely Positive that I am just drooling over!

Keep it Sassy

You can find and follow TheSassyQuilter  on Facebook, Pinterest, Bloglovin’, Instagram, Twitter or by email updates(form on right sidebar)!


Share Button
05-13-2014

Making Quilt Binding

Making Quilt Binding

Adventures in Quilt Binding…


Scrumptious Charm Quilt

When recently finishing my Scrumptious Charm quilt I tried a little something new with my quilt binding!

I love using my Robert Kaufman Quilting Calculator app on my phone to start my binding process. Just plug in your measurements and binding width and then it tells you how much yardage you need and how many strips to cut…genius!

Making Quilt Binding

 Now normally I cut my binding strips, usually 2.5″, and then join the strips on the diagonal(less bulk). I overlap them like this using pins to hold everything in place.

Making Quilt Binding

Then I stitch a diagonal line from corner to corner where they overlap. I like to overlap a bit so I know exactly where to stop and start my stitches.

Making Quilt Binding

This time I tried using a glue stick! Super quick and easy.

Making Quilt Binding

I just put a dab of glue in the upper right corner…you will trim this part off anyway.

Making Quilt Binding

With my needle in the down position I line it up in the corner where they overlap and stitch directly across to the opposite corner where the strips overlap. You can draw a line with a pencil or just eyeball it if your good:)

One of the awesome features on my machine, a Baby Lock Crescendo, is this laser line that shoots out straight ahead. It is great for short straight stitching and you can move it to the right or left!

Making Quilt Binding

Trim your 1/4″ seam.

Making Quilt Binding

Press open the seam to reduce bulk in your binding.

Making Quilt Binding

Trim off any corners if they are poking out.

Making Quilt Binding

Press your binding in half lengthwise….P.S. Why does my ironing board look twice as disgusting in this pic!

Making Quilt Binding

There you go! Beautiful binding that is quite Sassy:)

Keep it Sassy

You can find and follow TheSassyQuilter  on Facebook, Pinterest, Bloglovin’, Instagram, Twitter or by email updates(form on right sidebar)!

Share Button
04-29-2014

Scrumptious Charm Quilt Finish!

Scrumptious Charm Quilt

Scrumptious Charm Quilt

Finished up my Scrumptious Charm Quilt this weekend! (I know…my names for quilts are lame!) This quilt used a Scrumptious by Bonnie and Camille charm pack and a white Kona snow charm pack. I added some yardage for borders and that’s it! I wanted a really simple quilt that was easy to put together AND actually let me use up some of this fabric that is in my sewing room just staring at me:) This is a great quilt for a beginner. I will share some more details on this pattern soon. I know for beginners the specifics for those borders, backing and binding really help.

scrumptious_ quilt

I totally got busted taking pics on my neighbors fence!!! Which is electric…yikes, only one buzz so that was a success(take note of the white rope). I gave her a quilted table topper as a peace offering so she is not pressing charges, ha ha! She was really just worried I would get electrocuted. If you grew up in the country you have most likely touched one of these bad boys…you won’t forget it, but not so bad. Does this make me seem crazy???

Scrumptious Quilt

For the quilting I used Aurifil 100% cotton, 50wt. in white. I started by quilting the center panel with some basic straight lines and then moved to the 2nd border and quilted more straight lines. I wanted to break up the lines so I did a simple loop de loop in the inner border. This wasn’t too bad because you have a defined space. You are doing just a simple row of loops. Now what for the outer border????

Scrumptious Quilt

The outer border was pretty wide, about 5″. I was feeling pretty brave after the inner border….okay, let’s do a feather! I had been practicing those a while back and was improving. I marked a blue chalk line along the center of the border to help( you can still see some of those)…..so where are those feathers??? Well, let’s just say it was like starting all over! It has been many months since my previous adventures and a lesson was learned. Use it or lose it!  I opted for lots more loop de loops. They came out okay, but I definitely got a little lost sometimes.

Now, I am just analyzing this to explain my process, but in reality I think it is just fine and when washed up will be perfect:)

Scrumptious Quilt Binding

I used a machine binding technique to finish my quilt. You can find the tutorial HERE. In my tutorial I tell you to stitch in the ditch along the binding, but as of late I really am liking to stitch just on top of the binding for a top-stitched look. It also makes it less noticeable if you veer off a bit.

Scrumptious Quilt Binding

Here is the back…..P.S. don’t you love the Scrumptious paisley backing! I really loved working with this line of fabric.

Scrumptious Quilt Binding

side note….Isn’t it funny how the white thread looks teal on the binding?

scrumptious_quilt1

The winner of last weeks Cotton Bliss Giveaway is….

Janie!

Congratulations and enjoy your 10 FQ’s of Mirabelle from Cotton Bliss.

Keep it Sassy

You can find and follow TheSassyQuilter  on Facebook, Pinterest, Bloglovin’, Instagram, Twitter or by email updates(form on right sidebar)!

Share Button
04-25-2014

Triangle QAL- Final Link Up!

TriangleButton800

Final Link Up!

Okay you guys! Here it is….. the final week of the Triangle Quilt Along!

I don’t know about you, but I am so excited to see all of these quilts. I have already seen a few and they are Triangle-licious! It has been super fun getting to know so many fun and fabulous quilters too. I hope you guys have enjoyed quilting along with me….and I mean along with me! I am finishing up the quilting on my Sunnyside triangles this week myself. Keep Calm and Quilt On!

  sunnysidetriangles1

What is up for grabs?

Two Grand Prizes- a $75.00 gift certificate to Fat Quarter Shop and $50.00 gift certificate to Cotton Bliss!!!


These are some good ones so good luck and keep pushing to get those quilts done! You can do it…how do I know that? because you are a quilter! A little determination and a needle & thread and you are unstoppable!

You will have until Saturday, May 3rd to link up your finished quilt….that’s right, I said finished:) After all….it isn’t a quilt until it’s quilted!

What you need to know!

•You must link up a photo of your finished quilt to THIS post.

Please make sure that if you are sharing in the Flickr group to link your Flickr photo to this post!!!!

Being in the Flickr group does not enter you in the grand prize drawing. You must come to this post and click on the blue “Add your link” button to officially link up your quilt. You have until Saturday, May 3rd at midnight/EST.

•Your quilt must be finished and quilted.

•2 Winners will be drawn randomly. No Quilt Police here so just enter and have fun.

•Winners will be announced on Monday, May 5th along with our Triangle Extravaganza where we show off these beauties!

sunnyside_triangles2

If you haven’t yet…enter this weeks giveaway from Cotton Bliss HERE for a chance at 10 FQ’s of Mirabelle!

Please, if you have any trouble at all please email me and I will help you link up your quilt photo.  Just email me your photo and I will get it in the link up! I am happy to help:)

TriangleButton800

 Loading InLinkz ...

Keep it Sassy

You can find and follow TheSassyQuilter  on Facebook, Pinterest, Bloglovin’, Instagram, Twitter or by email updates(form on right sidebar)!

Share Button
04-20-2014

Flower Power Quilt an Oblongagonalong Finish!

flowerpower1

So excited to have finished up my Flower Power quilt!

This one was part of a quilt along over at Sew Fresh Quilts, called the Oblongagonalong. This unique take on a hexagon…a slightly different shape created by accident was fun to play with! It is made with all Y-seams so that was the challenging part…but, I finally got those down pat I think:) Lorna@SewFreshQuilts did a great tutorial for learning how to do those tricky seams HERE.

flowerpower3

It finishes at 35″ x 44″ and was made using fabrics from the Cuzco line by Kate Spain for Moda. I added a few yellow and bright blues to fill in where I needed extra. I think they add just the right amount of pop!

flowerpowercloseup

I used a meandering or stippling free motion quilting design and can I say it has been awhile! I had a little rust on these skills:) After a bit I started to feel like I was getting back in the groove of things. You can see some of the curves are a little angular and almooooost criss-crossing, that is a supposed no-no with stippling:)

flowerpowereyelashing

Here are a few areas that started to have some “eyelashes” and you can see my stitches were a little too long.  I was moving too fast for my needle speed. This causes the tension to get off…especially noticeable in curves and the bobbin thread comes up too far=eyelashes. I just had to get my hands and the needle speed in sync and go a little slower to get smaller stitches.

flowerpowerbacking

It was hard to decide what color thread I wanted to use since there are so many different colors.  I went with a magenta color thread for this one, it was a predominant color in the quilt and I had a similar color for the backing fabric…..when in doubt, match the back! This will hide the work a bit if you are worried about your stitching abilities:) I knew I was rusty and it wouldn’t be perfect.

flowerpowerbinding

I finished it up with a matching binding using THIS machine binding tutorial….purple would have looked great, but sadly no there was no purple left:( so I used more pink…matching the binding with the backing is helpful for hiding mistakes too!

Keep it Sassy

You can find and follow TheSassyQuilter  on Facebook, Pinterest, Bloglovin’, Instagram, Twitter or by email updates(form on right sidebar)!

Share Button
03-26-2014

Triangle Guest Post- Erica Jackman

Quilts by Erica Jackman@KitchenTableQuilting

Popping in today is Erica from Kitchen Table Quilting. The Triangle Quilt Along started last week and I thought we could use a little triangle inspiration along the way with a few tips and tricks from a pro!

What first drew me to Erica’s blog was the name…Kitchen Table Quilting! This is where almost all of my quilting takes place and I think most of us can relate:)

The name may have drew me in but, the fabulous quilts and her fun and modern sense of color and style kept me there! You can see some of her amazing work in the collage above.

Sundown - 2014 Pantone Quilt Challenge

When I came across Erica’s recent finish for the 2014 Pantone Quilt Challenge , I knew I had to ask her to give us a visit! Erica was kind enough to let me share her photos with you and came up with these tips for you guys…

Erica’s Triangle Tips!

blogphoto

Hi guys! Erica here.

I love working with triangles, and even though they take a little more practice than squares, they are really not all that scary. I do not like to use starch or glue, I just keep things simple and have never had a problem with sewing on the bias.

•Cut accurately – I use the 12.5″ Creative Grids 60 degree triangle ruler. It’s not a cheap ruler, but it makes cutting triangles easy and quick and it really helps me with making sure my triangles are the same size.  If your triangles aren’t cut accurately it is likely that your fabric will stretch when you are piecing and the quilt won’t lay flat.

•Pin thoroughly – I am a dedicated pinner, I almost never skip this step, but I think it is particularly important with triangles. Make sure not to stretch the fabric as you pin. I like to place a pin at the top and bottom of the seam and then 1-2 pins in the middle depending on the size of the triangles.

•Press carefully – I like to gently press the seam open and then use a little puff of steam. Make sure not to move the iron around, just press it down.

                                           ~Erica

Sundown Quilt with backing
Erica has a couple of free triangle tutorials too!
Erica even has some triangle goodness to be published here soon…

Briar Patch Quilt

This quilt is included in the upcoming Summer 2014 of Easy Quilts which should be available in stores soon.
Thanks Erica for sharing your work and top tips with us!
Be sure to go visit Erica at Kitchen Table Quilting and say hello:)

See you guys on Friday for the Triangle Quilt Along and the cutting instructions for those fabulous triangles. If you haven’t joined in yet…It’s not too late!!! You have until Thurday at midnight to link up your fabric selection pic HERE for the weekly prize drawing!

Grab a Button! and Share:)

Trianglebutton250

You can find and follow TheSassyQuilter  on Facebook, Pinterest, Bloglovin’, Instagram, Twitter or by email updates(form on right sidebar)!

Keep it Sassy


Share Button