Quilting Supplies at Craftsy.com
03-11-2019

Log Cabins and a Giveaway!

Log Cabins!


Aren’t they so fun? I live in one so I am a little biased:)

I bought this quilt kit from Fat Quarter Shop HERE and am slowly working my way through these blocks. 

The fabric line used is Smitten by Bonnie and Camille for MODA Fabrics.

image 0

Sweet Escape is a Thimble Blossoms pattern by  Camille Roskelley.

Log Cabin blocks are not super quick, but do look awesome when your done.

I just love these sweet fabrics.

This will be the first entire quilt I have made with just log cabin blocks.  

It finishes at 80 x 80. Wowza, its a big one!

Leave me a comment if you have ever made a Log Cabin Quilt!

A winner will be chosen to receive this super cute box that the kit came in!

Each comment is an entry. 

     Good Luck guys!

Craftsy

Keep it Sassy♥

You can find and pleas follow TheSassyQuilter  on Facebook, Pinterest, Bloglovin’, Instagram, Twitter or by email updates(form on right sidebar)!


Share Button
03-07-2019

Curvy Clutch

Curvy Clutch

So…. I am not a big bag maker. I have made just a few, but am ready to dive in and up my bag making skills!

I recently went to QuiltCon and purchased this cute little kit on the right to make this zipper pouch.

The pattern is called the Curvy Clutch and is from Pink Door Fabrics. The kit came with every thing I needed except the interfacing.

You can find the free pattern HERE.

Get Up to 70% Off Clearance Items at shop.mybluprint.com 2/26-2/27/19, no coupon needed!

There is always a little learning curve to making bags…. so different from making quilts!

On this bag I accidentally cut my fabric in the wrong direction and didn’t have enough fabric left for my second piece. I had to come up with some quick thinking and made a seam down the middle of one side to make it work. There is usually always a way to get it done!

I just love the way this came out! It isn’t perfect but not too bad.

I can’t wait to keep trying some new patterns!

Leave a comment of your favorite bag pattern if you have one:)

myBluprint.com

Keep it Sassy♥

You can find and follow TheSassyQuilter  on Facebook, Pinterest, Bloglovin’, Instagram, Twitter or by email updates(form on right sidebar)!


Share Button
01-06-2019

Churn Dash

Churn Dash Quilt Block

These Churndash blocks are one of my latest projects that I have started. I love this traditional pattern and it has been on my to do list for a long time!

The Churn Dash block is also known by several other names:

  • Monkey Wrench
  • Hens and Chickens
  • Lincoln’s Platform
  • Shoo Fly
  • Hole in the Barn Door
  • Fisherman’s Reel
  • Broken Plate
  • Love Knot
  • Ludlow’s Favorite
  • Quail’s Nest


My original plan was to make all the blocks the same, that seemed a little boring so I decided to do a reverse block and still keep it a two color quilt.

This is actually a very easy pattern, just some half square triangles and some strips.

I loved this fabric design! It is Add it Up by Cotton and Steel.

I pressed most of the seams to the side, but the two larger seams when finishing the block I pressed open just to reduce some of the bulk. This will help when you get to quilting this quilt. The needle doesn’t love super bulky seams.

CLICK HERE is a link to a FREE Churn Dash pattern.

Keep it Sassy Guys!

Craftsy

Keep it Sassy♥

You can find and follow TheSassyQuilter  on Facebook, Pinterest, Bloglovin’, Instagram, Twitter or by email updates(form on right sidebar)!

Share Button
11-10-2018

Layer Cake Quilts- Origami Squares

I have a fabulous finish for you guys today!

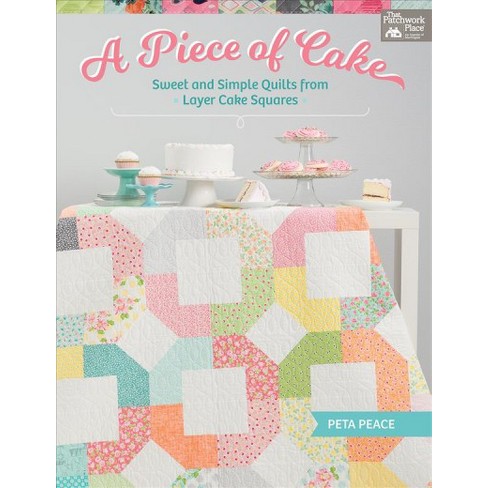
This quilt is from a book dedicated to all things layer cake!

Image result for peta peace layer cake

A Piece of Cake

Sweet and Simple Quilts from Layer Cake Squares

by Peta Peace

We all know we have at least 10 layer cakes piled up waiting for some inspiration….

pattern: “Origami Squares”

I just loved this pattern because it only required one layer cake.

Now… I made this layer cake myself because I wanted these specific colors.

I’m dying to try it again!


I used an all over stipple pattern for quilting and a zig zag stitch to finish off my binding.

And it wouldn’t be finished unless it has a label!

So I added my pre-made labels from ikaprint.com. Love these!

So if you have some layer cakes you wanna dive into… check out this book:

A Piece of Cake

Sweet and Simple Quilts from Layer Cake Squares

by Peta Peace

Leave a comment telling me how many layer cakes you have stored up in your sewing room:)

(I have 20 something! Yikes)


Keep it Sassy♥

You can find and follow TheSassyQuilter  on Facebook, Pinterest, Bloglovin’, Instagram, Twitter or by email updates(form on right sidebar)!

Share Button
10-16-2017

Quilty Vision Board

Do you have dreams of quilty goodness?

Visions of all the beautiful things you want to make?

Little mementos of quilty happiness?

Well its time for you to make yourself a Quilty Vision Board!

•••

You might also call this an inspiration board…. a collection of all the things that inspire you, excite you and bring a quilty smile to your face.

I have wanted to make one of these for myself forever!!! I was gonna use a cork board… but it was kinda blah. I had some more interesting supplies just laying around and think i came up with a much cuter version.

Supplies Needed:
  • Foam insulation board, however large you wish your Quilty Vision Board to be! If you get a large piece you can also make yourself a movable Design Wall(tutorial for that HERE) and then use the leftovers for this project. That’s what I did.

You can find all different kinds of foam insulation board at your local hardware store.

I bought this at Home Depot for $12. It measures 4′ x 8′ x 1/2″.

It measures about 1/2″ thick. Any similar product that you can stick a pin into will work.

  • Frame… If you want yours to have a frame. You can do this project without it.

I got this one at a thrift store and spray painted it black.

  • Painters tape, wider is better.

I used 2″ painters tape.

  • Stapler, even a mini will do!

Image result for mini stapler

  • Fabric, any kind will do…but a home decor weight fabric is nice.

Home Essentials Print Fabric 45"-Lovely Lattice Raspberry

Home Essentials Print Fabric 45″-Lovely Lattice Raspberry

I used this lovely print found in Joanns Home Decor dept.

Directions:

Measure the inside of your frame where your foam will set, then cut foam accordingly.

Cut your fabric so that you have an extra 5″ on all sides.  You need enough to fold to the backside.

Fold around all four sides and staple to the foam. Miter the corners to keep things looking smooth.

Use the painters tape to tape down the inner edges. This will keep it secure.

Make sure if your fabric is patterned that you keep things lined up straight when you are wrapping the fabric onto the foam board.

Set the foam into the back of the frame and secure in place with another round of painters tape.

Then flip over your masterpiece and hang in your sewing room!

I absolutely love mine!

My fabric matches my ironing board cover, so It really brings my sewing room together.

Now get to pining all your quilty inspiration! (I just used some cute sewing pins for mine)

I have some patterns up there, my fair ribbons, my quiltcon badges, cute quilty sayings… all kinds of fun stuff. I add to it all the time….can you tell I am short and can’t reach the top, lol!!!

Hope to see some of these you guys make, so please share!

Craftsy

Keep it Sassy♥

You can find and follow TheSassyQuilter  on Facebook, Pinterest, Bloglovin’, Instagram, Twitter or by email updates(form on right sidebar)!

Share Button