Quilting Supplies at Craftsy.com

Archives for May 2013

05-31-2013

Block 2

Block 2- Virtual Quilting Bee

Yesterday was Thursday, Thursday
Today i-is Friday, Friday
We-we-we so excited, We so excited
We gonna have a ball today!

(you know you wanna sing it? Friday song by Rebecca Black, lol)

Moving on to Block 2, Origami Star by Amy Newbold@Sukie Don’t Ya Know.

Just joining in? This is the 2nd block of The Virtual Quilting Bee by Amy Smart@Diary of a Quilter.


And….No, you are not too late to join in the quilty fun! Just click on the link above to get the info.

IMG_1666

Here is my fabrics all cut and ready to go, you might notice I veered off the chosen prints, anything goes.

If you are like me, you might be slightly terrified concerned when you look at this block!  I swear it’s easier than it looks;)

Tips for this block:

Chain piecing speeds up the process. Just keep feeding in the next pieces and don’t stop to cut the threads. This forms a chain of pieced parts. You can snip apart later and then chain piece the next pieces.

IMG_1711

Square up your four mini-blocks before assembling the final block. If not 4.5″, make it so! or rip apart and re-sew if too small:( Square it up again after adding the corner pieces(still should be 4.5″).

IMG_1715

Press open the seams on the back of the smaller strip blocks. Instead of pressing to one side, this reduces bulk when there are more seams involved. Notice these are still chain pieced together. I cut after I pressed, but can whenever want.

IMG_1713

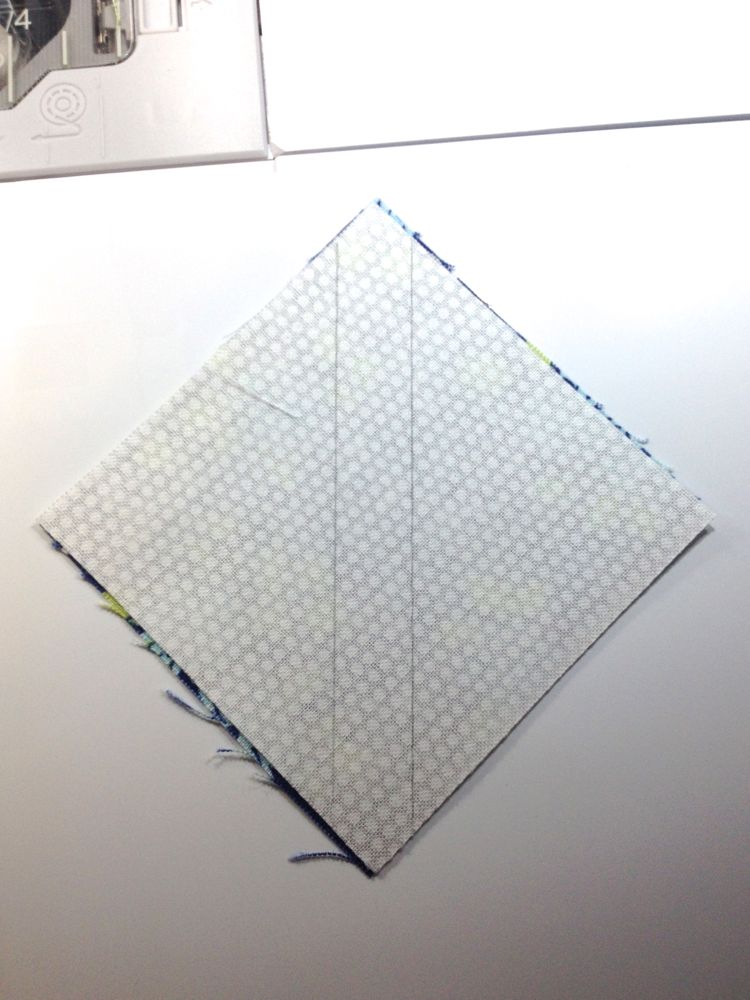
Pay attention to which corners you sew your smaller(white) squares onto!!! It really, really, really matters:) I had to rip out a few myself.

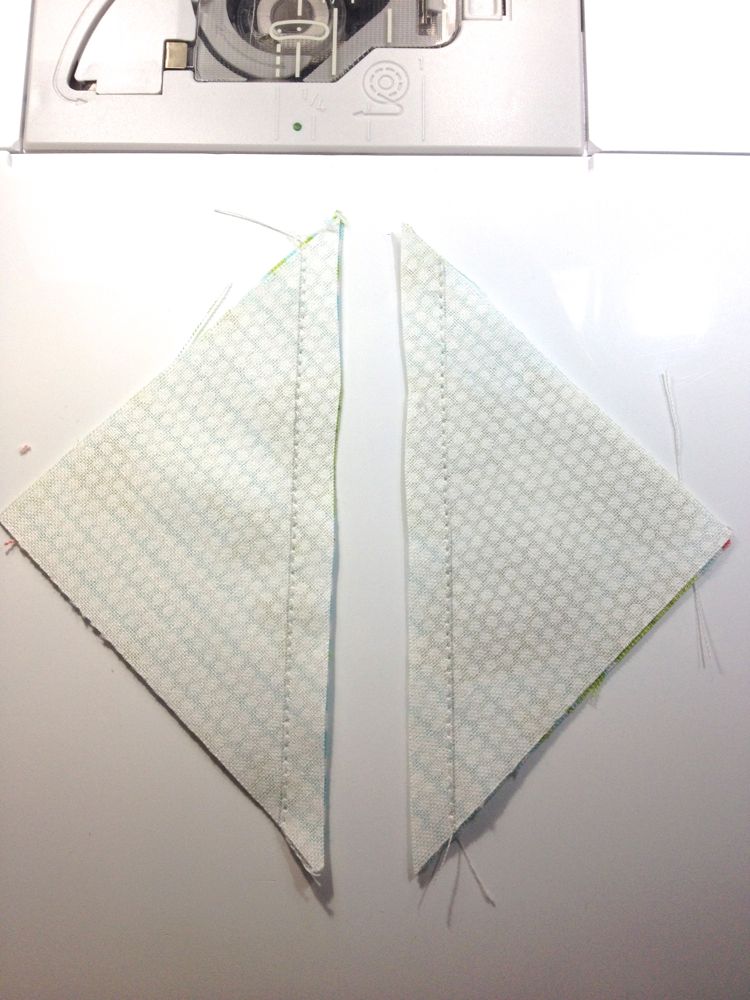
**After you sew on the corner squares, you will trim the inside seam. This leaves you with little sets of paired triangles. Go ahead and sew them together and you get these 1.5″ little cuties!!! Save them for another project or a miniature quilt.**

IMG_1725

So, how are you liking it? Not too bad, right? Have you finished block 1? Huh, huh, I wanna know:)

Share your finished blocks with me on my Facebook page , post a link to yours or join our Flickr group! I would love to see how everyone is doing.

Happy Quilting

Links: TGIFF, LAFF@RichardandTanyaQuilts, ShineOnFridays

Share Button
05-29-2013

WIP Wednesday

 IMG_0001

So what am I working on this week…

Mostly the catch up blocks for The Virtual Quilting Bee @Diary of a Quilter, finishing the FMQ on my sunbonnet sue, and binding another quilt.

Busy, busy, busy! I should have a good finish for Friday:)

This is a pic of another quilt I started about a year ago!!! Yikes. It is a baby quilt that is hand pieced and will be hand quilted. I wanted bragging rights to say I hand pieced at least one:)

If I can get it done I will enter it in the State Fair this September…who knows, it could happen.

This is a Tumbling Block pattern and was one of my Grandmother Sassy’s favorites for babies, I think because it is too difficult to do much larger!!!

I try to work on this one when I have down time or am away from the machine. Actually, I just carry this project around with me, but don’t actually work on it,Lol. It just sits in its little project bag all lonely…glaring at me! The thrill is gone(insert BB King music), but I will keep dragging it around until I get my hand-piecing mojo back. I will do at least one block today just for spite!

Happy Quilting and See ya Friday!

Links: WIPWednesday@FreshlyPieced, WeDidIt!Wednesday@SewMuchAdo, ThursdayThreads@627Handworks, ShowandTellTuesday@IHaveToSay

Share Button
05-28-2013

Commagain?

 IMG_1839

Okay, that post title has a high cheese factor;) but……

Look what came in the mail! I’ve been waiting to get my hands on some of this line for a while, Comma by Zen Chic for Moda fabrics:)

I have no idea what I am gonna do with it, but I had to have it…ya know what I mean?

There is a long list of quilts I am dying to make, How about you?

Here are a few of mine: dresden plate, a simple HST quilt, orange peel, chevron, swoon, triangle, drunkards path, log cabin, brick….the list goes on and on! I recently wrote a bunch of them down because I kept forgetting what was on my list.

Well, no matter what…with fabric this cute, it will look great! (no such thing as an ugly quilt in my book)

What is a quilt you are dying to make and what fabric line or style are you dying to make it in???

Links: AnythingGoes@StitchbyStitch and FabricTuesdays@QuiltStory

Share Button
05-24-2013

Block 1

IMG_1709

Okay guys…it’s go time! This is Block 1 of The Virtual Quilting Bee. This is a Sawtooth Star block with accents in the corners. I don’t know about you, but I love these blocks, they are just so darn adorable:)

This block was hosted by Sherri@A Quilting Life. Go and check out her tutorial for this block and all the details here.

If you are just checking in, we are joining  Amy@Diary of a Quilter  with her Virtual Quilting Bee. She is posting a new block every other week; 16 blocks (that finish 8″) total. We are a little behind, so I am posting a block every week until we catch up or you can go to her blog and wizz on through as fast as you like.

I am using the fabric line, Happy-Go-Lucky by Bonnie and Camille, to construct my blocks. Use whatever fabrics you like and join in anytime!

This block was pretty straight forward, only solid squares and half-square triangles(HST).

HST’s can be tricky, but the method used is one of the easiest.

IMG_1683

With your two squares face to face, draw a line from corner to corner. Then sew 1/4″ away from line on both sides. I used a little tool called “Quilter’s Magic Wand”, it has a line down the middle and is 1/4″ to the edge on both sides. It is great for marking 1/4″ lines. With this I will sew directly on my marked line.

         IMG_1685  IMG_1686

Once you have sewn your lines, cut directly between them. You can use a rotary cutter or your scissors. Then press open your HST!


         IMG_1688  IMG_1692

If you can make these….you got it made!

Square up and trim those little dog ears(yeah, that’s what they are called) off the corners.  Squaring up means using your ruler to make sure the block, or pieced part of a block, is the correct size. You may have to trim some excess(good thing) or rip and re-sew if too small(bad thing).

If all your HST’s are totally uncool and square,  you are ready to piece your block!

TIP: HST’s can be a little stretchy because of the bias edges, I like to use a little spray starch to keep things in shape. One of my faves is  Mary Ellen’s Best Press, it is clear and non-flaking.

Now get to making your Sassy Sawtooth


(Linking in with LinkAFinishFriday@RichardandTanyaQuilts , ThankGoodnesIt’sFinishedFriday , Quilt Story and ShineOnFriday)

Share Button
05-22-2013

WIP Wednesday

Sunbonnet Sue

So here is the rest of my Sunbonnet Sue!

This quilt is a special request for a Sunbonnet Sue and lots of purple.

I made my center medallion first. I used fusible web to do raw edge applique with a blanket stitch on my machine to  secure the edges. Next, I added a 2 patch border with pinwheels for the corner stones and some white borders to finish. I thought it needed a little something else, so I added a couple more border strips. I kind of liked the border strips just on two ends, so I left it just like that!

Now I have it all sandwiched and ready to quilt. FYI… I used spray adhesive for the basting and 100% cotton for batting.

Hmmmm, now how am I going to quilt this thing?

(Linking in with WIP Wednesday@FreshlyPieced and We Did It! Wednesday@SEWmuchado and ThursdayThreads@627handworks)

Share Button
05-20-2013

Virtual Quilting Bee….Anyone???

 IMG_1695

So…..here is a look at what I was up to this weekend!

            I am going to join in with The Virtual Quilting Bee, hosted by Amy Smart at Diary of a Quilter(awesome blog by the way!)

The quilt along actually started a while ago, but we are gonna catch up!

            Some of you guys might already be following Amy’s blog or the virtual quilting bee, so you can help us out.

She uses guest bloggers to create the blocks. So you get to check out some cool blogs too! The blocks are 8″ finished size, 16 in total.

The virtual quilting bee is giving two examples of each block. One using the fabric line, Happy-go-lucky by Bonnie and Camille and another option with Kona solids. I just so happened to have a Happy-go-lucky FQ bundle so that is what I am using, but I am sure you could use any line. Maybe even go scrappy!

I will post my progress every Friday and show you my block. For all the beginners, I will let you know if anything is super tricky or needs a “sassy” breakdown:)  For the Pro’s out there, I would love to just see what your blocks are looking like. Once we catch up, we will just follow her schedule.

It doesn’t matter if you are behind so join in any time:)

I think it will be exciting and I hope you guys will follow along:) It will only be one block at a time, so it shouldn’t be too overwhelming and the blocks look super cute and fun!

To check out The Virtual Quilting Bee, click on the badge or picture above! This will help you catch up on all the posts to prep you for the quilt along and show you all the finished blocks so far.

So pick out your fabric and come back Friday to see my Block #1 or go ahead and get started:)

I have never  done a quilt along before, so if you haven’t either…Let’s do it!

Linking up with Anything Goes Quilt ‘n Sew @Stitch by Stitch  and Let’s Get Acquainted! @Plum and June

Share Button
05-17-2013

Binding your Quilt – Part 3

 IMG_1425

For the complete guide to binding your quilt…click here!

Are we done yet? Machine Finishing your Binding

1. Now that all your binding is attached to the front of your quilt, you now have to secure it to the other side.

Once again, start at a mid-point of one of the sides of your quilt. Fold the binding over to the backside of the quilt. Secure it to the back with a pin, making sure to cover the previously stitched line. You can go ahead and pin the binding along the entire quilt edge or just work in sections.

IMG_1149 IMG_1150

2. When you get to the corner, make sure you turn it completely, pushing the corner out to a nice point. Fold one side of the binding over and pin. Then turn the other over and pin. They should overlap forming a fold that goes out to the point of the corner(mitered fold).

IMG_1156 IMG_1157

3. Turn the quilt over so that you’re looking at the top of the quilt. Insert your needle into the seam where your binding meets the quilt top. The goal here is to sew in the seam line. When you pinned the binding over to the back of the quilt and made sure to cover the line of stitching, you made sure that you will catch the fabric when stitching on the front of the quilt. Sewing in the seam line hides your stitching on the front of your quilt,too.

If you use a matching thread it won’t be so noticeable if you wander out every now and then, like that could ever happen...

IMG_1155

4. When you get to the corner, leave your needle down directly in the corner. Lift your presser foot and turn the quilt so you can head down the next side. Keep going till you get to where you started, then sew a few stitches over your beginning stitches and you are done!!!

Fantabulous!!! Your SASSY binding is D-O-N-E!

(Look at that quilt, whipping in the breeze…so securely bound it could last for ages!)

IMG_1167


Great Job! All you Sassy Quilters out there:) Keep me posted on your binding and let’s get these quilts finished!

Happy Binding

Click here for the complete Sassy Guide to binding your quilt!

Share Button
05-16-2013

Tip of the Week…

Does it drive you crazy when you are pressing your lovely, quilty things

and you just need to snip a thread or two…

but your scissors are nowhere to be found?

Tie a ribbon to a small pair of scissors and pin it to your ironing board!

Share Button
05-15-2013

WIP Wednesday…

IMG_1637

Yes, I am still finishing the binding on this quilt!

I did manage to pick out the fabric I wanted and also get the binding made last week.

Now….I just have to get it on the quilt!

I used this awesome border, backing and binding calculator to figure out exactly how many strips to cut:

 Border,binding,backing calculator

I am having second thoughts on this green….I might just cave in and go back to pink!

What do you think?

We shall see!!!

Either way it will be done this week for sure.

Here is a sneak peak at something else I am working on….

IMG_1639

a Sunbonnet Sue special request for a special little girl.

Stay on one project, stay on one project…….Oh well!

Happy Stitching

Share Button
05-13-2013

And the Winner is…

IMG_1627

Congratulations to Ellie!!!

She just won a…

 12 piece, Hello Gorgeous fat quarter bundle by Melissa Ybarra for Windham Fabrics!

Thanks to everyone who entered the contest. I truly appreciate all your kind comments and participation

And don’t worry, there will definitely be more give-a-way fun to come!

Come back this week for Part 3- Are we there yet? Machine finishing your binding, Sassy Tip of the Week and more quilty goodness.

Keep it Sassy!

Share Button