Quilting Supplies at Craftsy.com
09-04-2014

X-Plus and a bonus tip!

X-Plus quilt block

I have been working on my X-Plus blocks for my next border in my Aviatrix Medallion quilt…..don’t you just love these blocks! This is one reason I really wanted to make this quilt. I just love these blocks and wanted to get a feel for making them. Quite a few pieces, but not so hard. I can’t wait to show you all of these finished up…all these solids really look great together.

I am pretty much following Elizabeth Hartman’s pattern for all the different solids(bought a kit), she coordinated these so well! I am switching up my white background for this sketchy print and the gray for a gray polka dot…to spice it up a bit and make it my own. Here is Elizabeth’s original quilt:

Flat Shot

It’s a biggie, too 80 x 80. Check out the #aviatrixmedallion to see all the cool different ways people have put this one together.

You can purchase the pattern HERE or join in the quilt along if you are interested.

Bonus tip…

You may have heard of this one before, but here goes:)

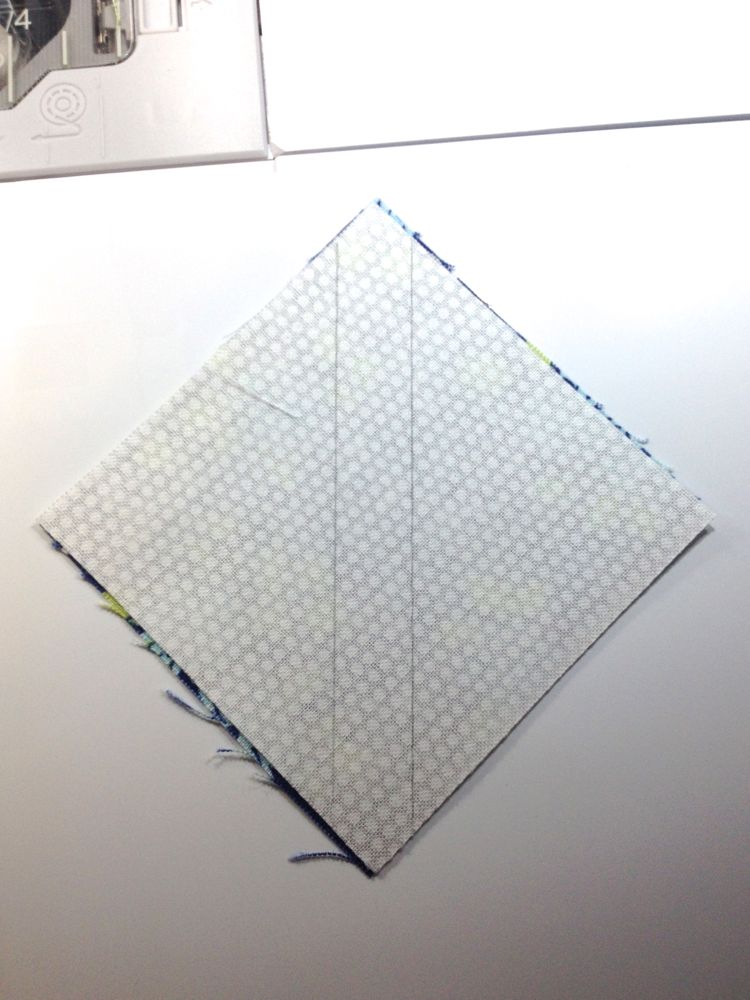
For the corner units of this block you have you sew squares on the diagonal, then trim the corner off and press it open.

If while you are doing this you go ahead and stitch another line about 1/2″ away…(toward the outer corner!!!) and then cut between the two lines of stitches….

bonus hst

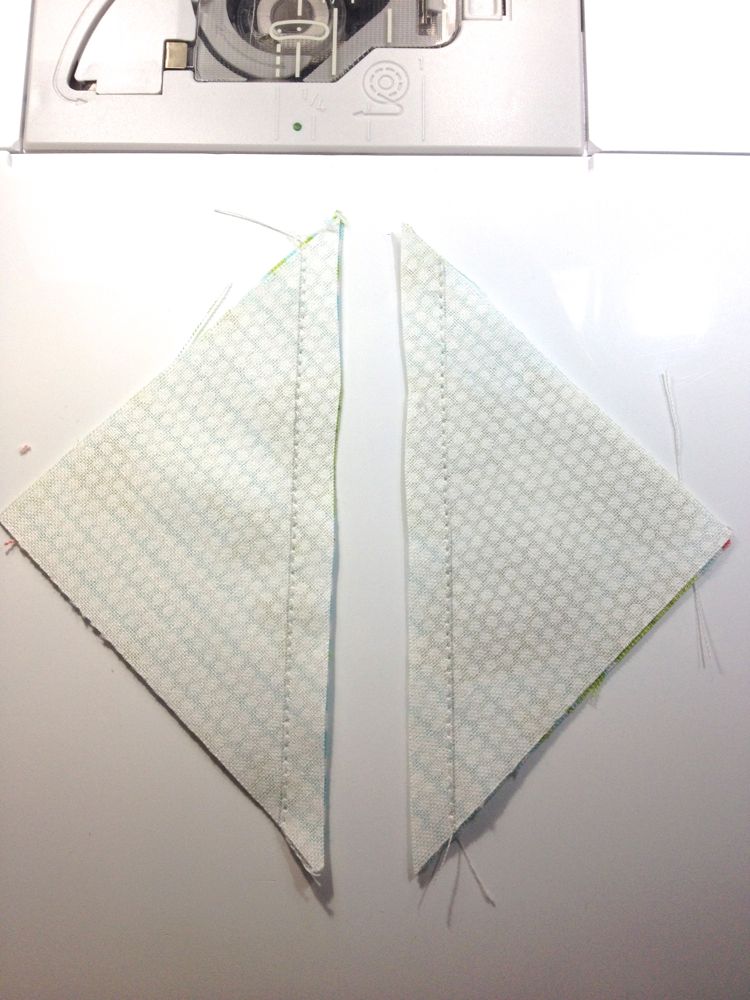
You will get these lovely little bonus half square triangles! and Yes….they are tiny:) About 1″ or so.  I love saving these and plan to make some little fun projects like fridge magnets or christmas ornments with them.

I always stitch these up and then toss them in a jar until I am ready to use them. To cut triangles this small and try to feed them through your machine is a little tough, but this is a simple quick way to  just pop ’em out.

bonus hst

This will work for any type of block where you are stitching the square on the diagonal and then trimming it off….other examples would be in Flying Geese and Snowball techniques.

I just love all these solid and can’t stand to just toss these little cuties!

Keep it Sassy

You can find and follow TheSassyQuilter  on Facebook, Pinterest, Bloglovin’, Instagram, Twitter or by email updates(form on right sidebar)!

Share Button
03-14-2014

Friday Finish- Tangerine Style!

TangerineTango1

Tangerine Tango, 50″ x 62″

Two finishes to share on this fabulous Friday:) Tangerine Tango…

and

Tangerine Squared…

TangerineSquared3

Tangerine Squared, 37″ x 48″

Both of these quilts are made completely of HST’s.  I started making these quilts using Kelly@My Quilt Infatuations tutorial HERE, but got side tracked and just made a bunch of HST’s and went for it! So I ended up with enough for two quilts, bonus:) Tangerine Tango is throw sized and Tangerine Squared is a smaller baby quilt.

Tangerine Tango is a scrappy chevron layout and I am not sure what the Tangerine Squared is….sunshine and shadow? or square in a square?

I tried to take some serene pics …. No, I did not glue this quilt to the fence:) It was so windy! and cold!

TangerineSquared

Tangerine sunset…

IMG_5847

I used Aurifil thread in a teal and orange 50wt. cotton from the Camille Roskelley, Simplify collection. The colors in this collection just seem to match everything I can come up with! The quilting is all straight line designs using a walking foot on my machine.

TangerineTango2

The fabrics are from a bundle of Fandango by Kate Spain for Moda with a little Fig Tree thrown in there and Denyse Schmidt for the backings.

TangerineSquared5

and the backs…

TangerineTango5

Sorry these are so wrinkly! Being folded in the car all day…bad idea. I took these on the way home from work:)

Yes, I probably look like a crazy quilt lady taking all these pics at various roadside stops! This was at a local wildlife area so no trespassing:)

IMG_5830

the binding…

TangerineSquared2

This fabric bundle had two different stripe prints so I used one on each quilt.

TangerineTango3

I really love stripes for binding!

I used this machine binding tutorial HERE.

TangerineTango6

Oh, and I finally got me some official labels for my quilts:) Now I have no excuses to not at least get these on there.

They are from ikaprint. You can find their shop on Etsy HERE.

You can find and follow TheSassyQuilter  on Facebook, Pinterest, Bloglovin’, Instagram, Twitter or by email updates(form on right sidebar)!

Keep it Sassy

Online Quilting Class

Share Button
06-07-2013

Block 3

Block 3- Virtual Quilting Bee

Block 3- The Virtual Quilting Bee

For a detailed tutorial check out April Rosenthal of Prarie Grass Patterns…..this is her block for the Virtual Quilting Bee. For more info on the Virtual Quilting Bee(and links to each block tutorial) visit Amy@Diary of a Quilter, she is hosting this quilt along. I hope some of you guys will join in with us. I promise its easy!

I really liked this block. It was pretty easy and I loved the color combo.

If you look close  you can see it is just 4- HST’s(half square triangles). One half of the HST is pieced.

IMG_1668

I love patterns for blocks where you just cut the squares on a diagonal to get the triangles! Makes it even easier. The green and white ones are cut that way.

           IMG_1746 IMG_1747

So cut your triangles and add to the sides of the orange square, the put your HST together!

IMG_1758

Carefully press open toward the solid half of your HST.

             IMG_1760  IMG_1761

The goal with this part(if you are trying to be picky!) is to have the point of your orange square precisely touch the seam. Try not to cut it off or have a gap between the two. If you are off just a little…no big deal:) Square up your finished blocks to 4.5″ and then put ’em together.


bloghop2button

Don’t forget today starts the New Blogger Blog Hop! Here is a list of all the blogs featured today:

Nancy @ Owen’s Olivia

Amy @ 13 Spools

Ashley @ Wasn’t Quilt In A Day

Casey @ The Studiolo

Nanette @ Yeah, I Made That

Ange @ Heart Of Charnwood

Kim @ Robot Mom Sews

Erica @ Kitchen Table Quilting

These bloggers have made extra special posts just for you today, so

be sure to leave a comment and share some quilty love!

You will see me on this list June 28th!!!

Keep it Sassy

(Links:AnythingGoes@StitchbyStitch, TGIFF, LAFF@RichardandTanyaQuilts, ShineOnFridays)

Share Button
05-24-2013

Block 1

IMG_1709

Okay guys…it’s go time! This is Block 1 of The Virtual Quilting Bee. This is a Sawtooth Star block with accents in the corners. I don’t know about you, but I love these blocks, they are just so darn adorable:)

This block was hosted by Sherri@A Quilting Life. Go and check out her tutorial for this block and all the details here.

If you are just checking in, we are joining  Amy@Diary of a Quilter  with her Virtual Quilting Bee. She is posting a new block every other week; 16 blocks (that finish 8″) total. We are a little behind, so I am posting a block every week until we catch up or you can go to her blog and wizz on through as fast as you like.

I am using the fabric line, Happy-Go-Lucky by Bonnie and Camille, to construct my blocks. Use whatever fabrics you like and join in anytime!

This block was pretty straight forward, only solid squares and half-square triangles(HST).

HST’s can be tricky, but the method used is one of the easiest.

IMG_1683

With your two squares face to face, draw a line from corner to corner. Then sew 1/4″ away from line on both sides. I used a little tool called “Quilter’s Magic Wand”, it has a line down the middle and is 1/4″ to the edge on both sides. It is great for marking 1/4″ lines. With this I will sew directly on my marked line.

         IMG_1685  IMG_1686

Once you have sewn your lines, cut directly between them. You can use a rotary cutter or your scissors. Then press open your HST!


         IMG_1688  IMG_1692

If you can make these….you got it made!

Square up and trim those little dog ears(yeah, that’s what they are called) off the corners.  Squaring up means using your ruler to make sure the block, or pieced part of a block, is the correct size. You may have to trim some excess(good thing) or rip and re-sew if too small(bad thing).

If all your HST’s are totally uncool and square,  you are ready to piece your block!

TIP: HST’s can be a little stretchy because of the bias edges, I like to use a little spray starch to keep things in shape. One of my faves is  Mary Ellen’s Best Press, it is clear and non-flaking.

Now get to making your Sassy Sawtooth


(Linking in with LinkAFinishFriday@RichardandTanyaQuilts , ThankGoodnesIt’sFinishedFriday , Quilt Story and ShineOnFriday)

Share Button