

My Quilts…
Well, I finally added a gallery of some of my own quilts!
Click on the link to Check it out!


Well, I finally added a gallery of some of my own quilts!
Click on the link to Check it out!


When sewing on your binding….use a walking foot.
A walking foot is great for long seams and it keeps them smooth and flat
instead of slowly wrinkling up on you.


Before you start…..you have to create your binding strips!
Check here for how to make your own binding,
or buy some pre-made(you may still have to join some packages together to have it long enough).
Get your binding strips cut, joined together and then pressed in half
and you are ready to get this binding partay started!
1. Trim and square up the edges of your quilt. You should have excess backing and batting that needs to be removed.

2. Start the binding process at a mid-point on one of the sides of your quilt. It is hard(if not impossible) to join your ends together at a corner, and its less noticeable if it doesn’t look fantastic….like that could ever happen, your a quilty superstar and you can do this in a snap!

3. Leave a 6″ tail of binding before you start attaching it to your quilt. This gives you room work in when joining the final two ends together.

4. Pin your binding to the front of your quilt. You want the raw edges to line up with the outer edge of your quilt, this means the folded edge is toward the center area of the quilt. Pin the binding just until you get to the first corner you come to. Place a pin or mark a small line 1/4″ away from the very end of your top. Don’t worry this mark will be on the inside so you won’t see it.

5. Now start sewing a 1/4″ seam along the binding, removing pins as you go. Take a couple of back stitches at your starting point. Continue sewing along the binding and stop 1/4″ away from the corner(at your pin or mark). Again, take a couple back stitches and then take your quilt out of the machine. We need to fold the binding a little before we continue.

6. Fold the binding strip upward, this should make a triangular fold with the point going directly into the corner of your quilt(left pic); Now, fold the binding strip back down onto the next side of the quilt you will be working on. This fold should be flush with the side we have already attached(right pic). Pin this in place at the fold and continue to pin along this side of your quilt, marking/pinning the 1/4″ mark at the next corner.


7. Start sewing your 1/4″ seam again, beginning at the very edge of the quilt. Stop again at your next 1/4″ mark or pin before the corner, and repeat the corner folds from step #5.

8. After you round your last corner, stop approximately 12″ apart from where you started. Take a couple of back stitches, and remove your quilt from the machine.

What is the most frustrating part of binding your quilt???

So have you heard of Bloglovin’ ?

I hadn’t either, but since I started my blog I noticed it on a lot of other blogs I follow. I brushed it off as some other thing I would have to sign up for and manage, but now that I am using it…it’s pretty awesome and REALLY easy to use.
So……if you have a lot of blogs you like, you know how annoying it is to check each one and then find there is not even any new posts!!! I can’t tell you how much time I have spent going to each web page or have kept 10 tabs open at a time just to keep up with the latest blog posts:(
Think of Bloglovin’ as a Pinterest for blogs…and we all love Pinterest:) You can connect through email or Facebook and picking out all the blogs you want to follow was super easy and I even found some other awesome quilt blogs. Bloglovin’ updates you every time each one has a new post and you have a blog roll of all the latest post. This lets you breeze through all your blogs main pic, title and a snippet to see if you wanna check it out. So if you are a blog follower (and I think you are)….Check it out! Keep on top of all the quilty fabulous-ness out there!!!
Oh, and I almost forgot they have an app for your cell phone and an add-on for your browser’s tool bar. So your only one click away from your favorite blogs!

Do you have any other fabulous quilt blogs that you follow? Comment, and let me know the link!
♥Happy Quilting♥


Congratulations Rachel Rand!!!
You have won the Free, Fabric, Friday Give-a-way!
I will be emailing you for your address so I can put those in the mail ASAP!
Definitely come back and show us what you make with these:)


(happy-go-lucky by Bonnie and Camille for Moda fabrics)
Well, guess what?
The Sassy Quilter has reached 1,000 views!!! So in honor of our Happy day I am giving away two, Happy -Go- Lucky by Moda charm packs:)
That’s 84, 5″x 5″ squares of quilty fun!
All you have to do to enter is leave a comment below and subscribe to follow my blog. To subscribe look for the box to the right or at the very bottom of the posts, depends on your device. The contest will run Friday thru Sunday, 12p.m., the winner announced on Monday!
Now, onto the post…

Do you ever get to the quilting ruler isle and your head starts to spin, feel a little woozy, or just break into a sweat?……Well, don’t panic!
We are gonna break it down for you.

Some basic ruler info:
1.They align and hold fabric firmly to your cutting mat for proper cutting and measuring.
2. Made of acrylic and are see-thru. If too thin, rotary cutter would jump the edge and…you could be visiting the E.R. with a finger in your pocket.
3. Printed vs. Laser Cut. Markings can be printed, or laser cut. Laser cut is more accurate.
4. The more markings the better. Thin lines that measure down to 1/8″ are great.
5. Grip is good. One side may be rougher for more grip on your mat. Rubber pads or sandpaper discs can be added to help.
6. Consistency within a project can help. Different brands can vary, so use the same rulers during a project.
Here are some popular brands available:
OmniGrid, OmniGrip, June Tailor, Quilt in a Day, Fons and Porter, Get Squared, Creative Grids
3 basic patchwork rulers you can’t live without are:

• 6 x 24– this long ruler covers the WOF and keeps you from having to fold the fabric to get a nice straight cut. You will also use it for just about anything you need to cut or measure. Some like to also have a 6 x 12 for a shorter ruler when the length is not needed. 30/45/60 degree lines marked.
•6.5 X 6.5– great for squares and triangle squares, diagonal markings. Common smaller block size. The one in the pic above has an additional square size in the center…bonus!
•12.5 x 12.5– this one is also great for squares and triangle squares, includes all smaller square sizes, and is a common larger block size. And, yes it does include the 6.5 x 6.5, but is a lot bigger so having the smaller is still beneficial.
Specialty Rulers???
These are rulers for……yes, you guessed it…special shapes and projects!
The list of specialty rulers can be never ending, but here are some basic categories and examples.
strip cutting– ShapeCut, ShapeCut Pro♥
triangles– HST, QST, flying geese, setting triangles, corner triangles
1/4″- marking…1/4″ seams, straight lines
circles-will need 18 or 28mm rotary cutter
wedge-Dresden plate, tree skirt
wave edge– scallop borders
shapes– apple core, tumbler, hexagon, diamond, templates
Just in case you wanted to know…my favorite specialty ruler is the ShapeCut Pro! I can cut all my strips in a jiffy and even whip up my own “sassy” jelly roll!

Happy Measuring and Cutting! Safety First:)
What’s your favorite ruler???


1. First things first……you need to decide how much binding you will need.
Here is a great binding calculator you can use:

Just plug in your numbers for your quilt size(ex. 45″ x 60″), width of your fabric(42″ is a safe #), beginning width of your binding strips(usually 2 to 2.5) and it will tell you how much yardage you need and how many strips to cut….Awesome:)
Now that you know how much you need, go ahead and cut your strips.
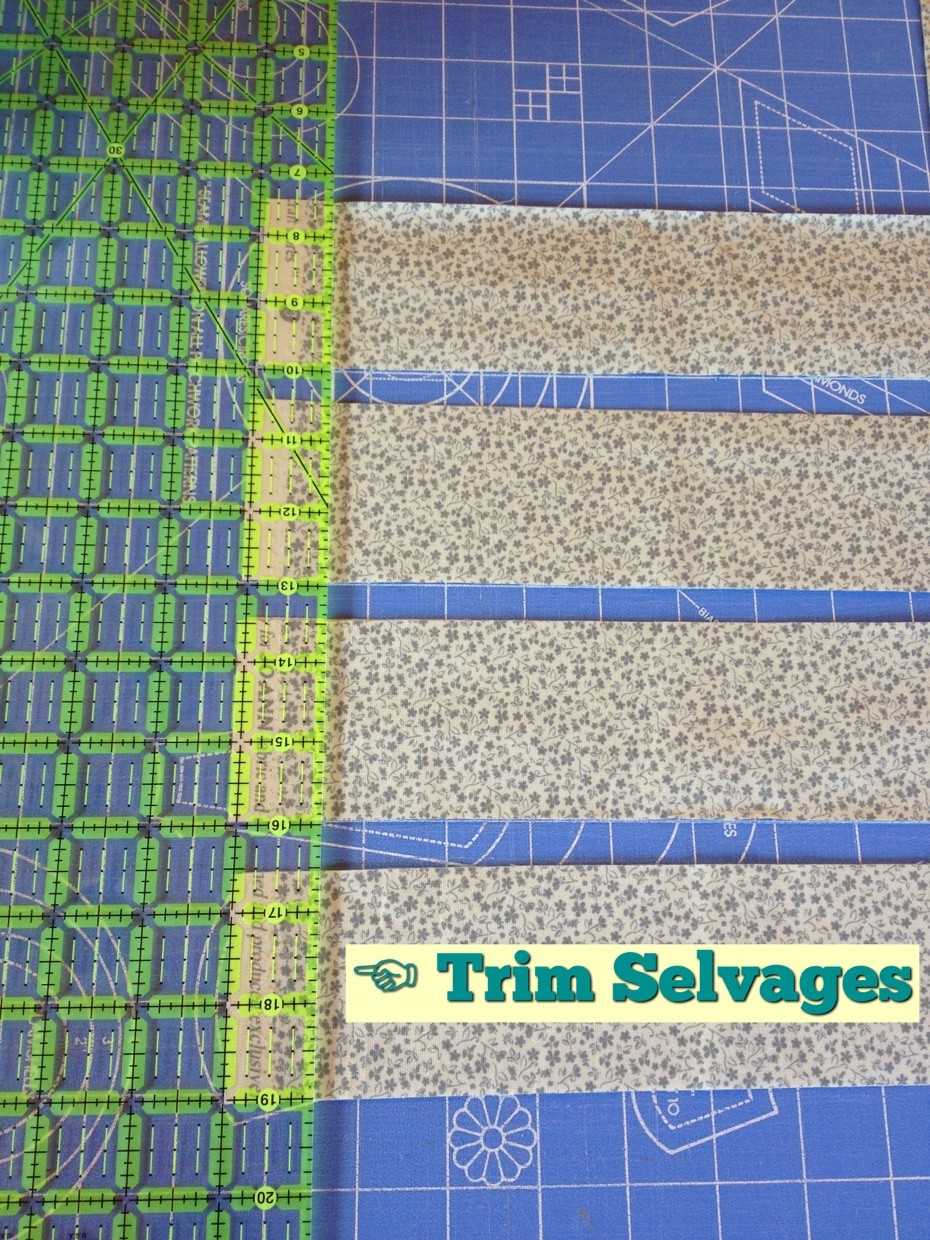
2.The next step is to prep the strips so we can join them together. I like to leave my strips folded in half, just like when I cut them, and then trim the selvages off the ends.

3. Unfold and place one end of a binding strip right side up, lay the end of another strip wrong side up on top of the strip at a right angle(like the letter “t”). It should overlap on all sides. Use the lines of your mat to make sure it’s straight.

4. Draw a line from corner to corner. I like to pull the fabric over my ruler to see if this makes a continuous strip, just to check myself….it never hurts. Secure with pins on both sides of the line so it doesn’t slip.
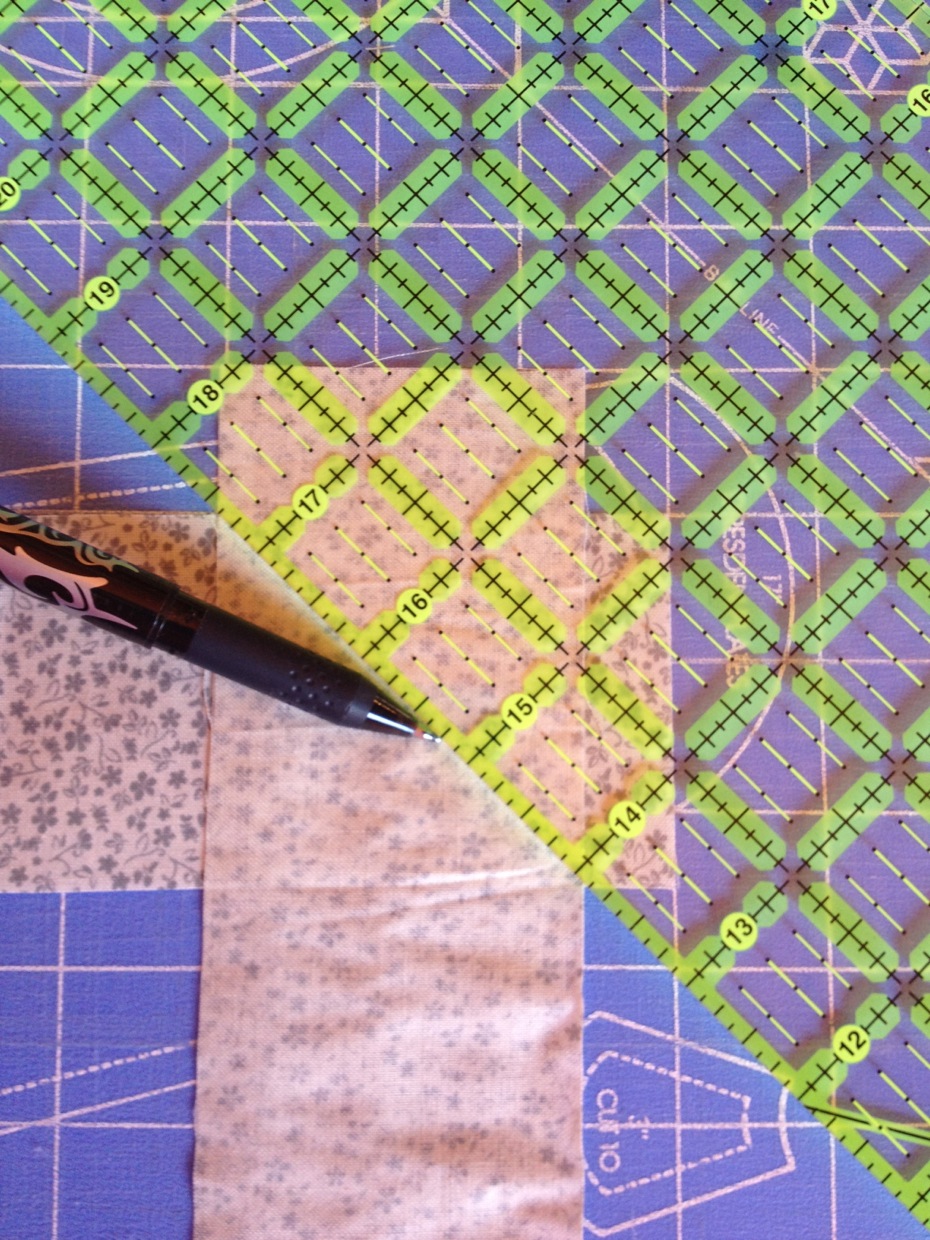

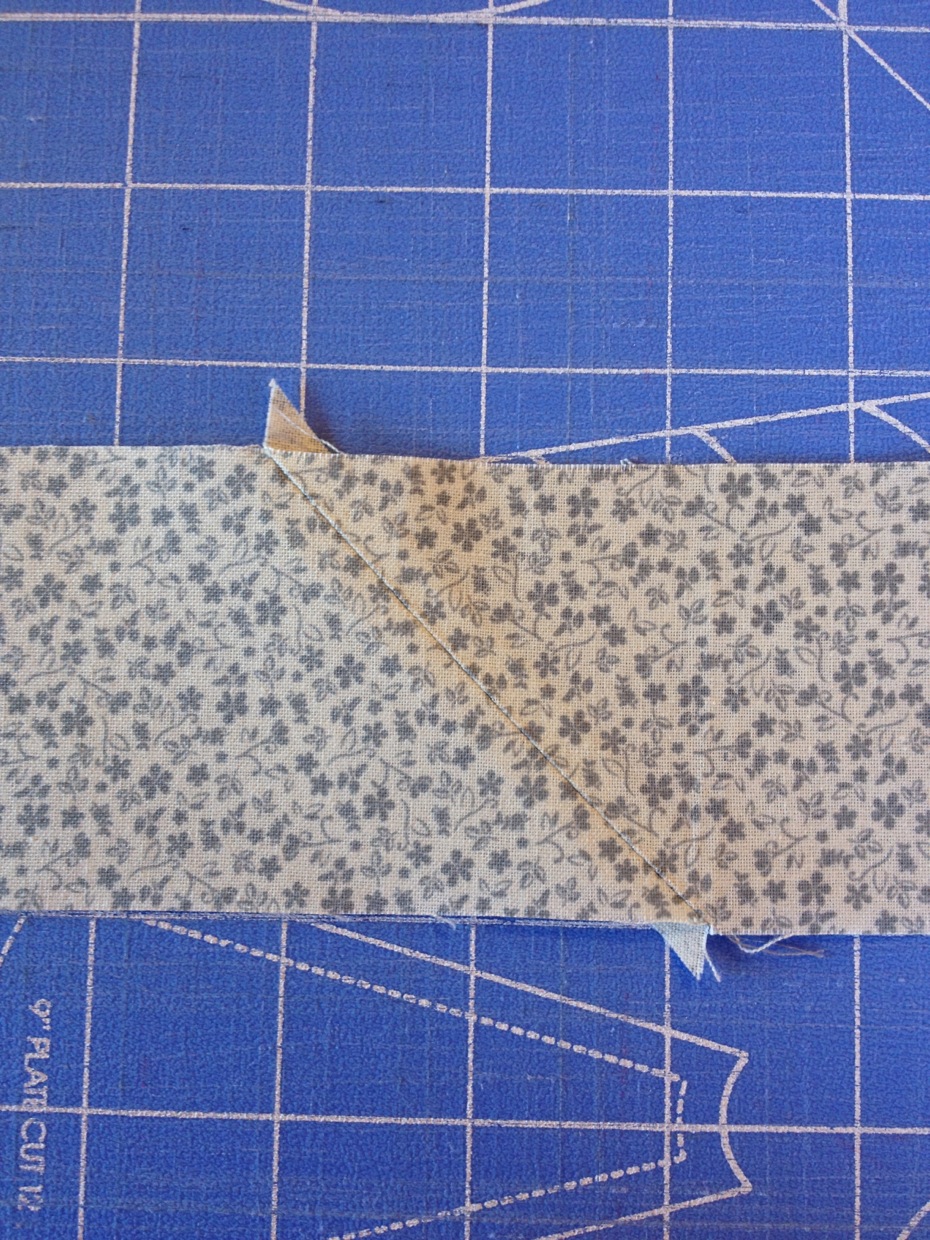
5. Sew directly on the marked line. Line up your 1/4″ mark on your ruler along the stitched line and trim excess.

6. Press open and then press open your seams on the back. Making bias binding(binding where seams are joined at 45 degree angle) and pressing open seams allows your binding to be less bulky where it joins the next strip. Continue adding strips until you have one long strip of binding.
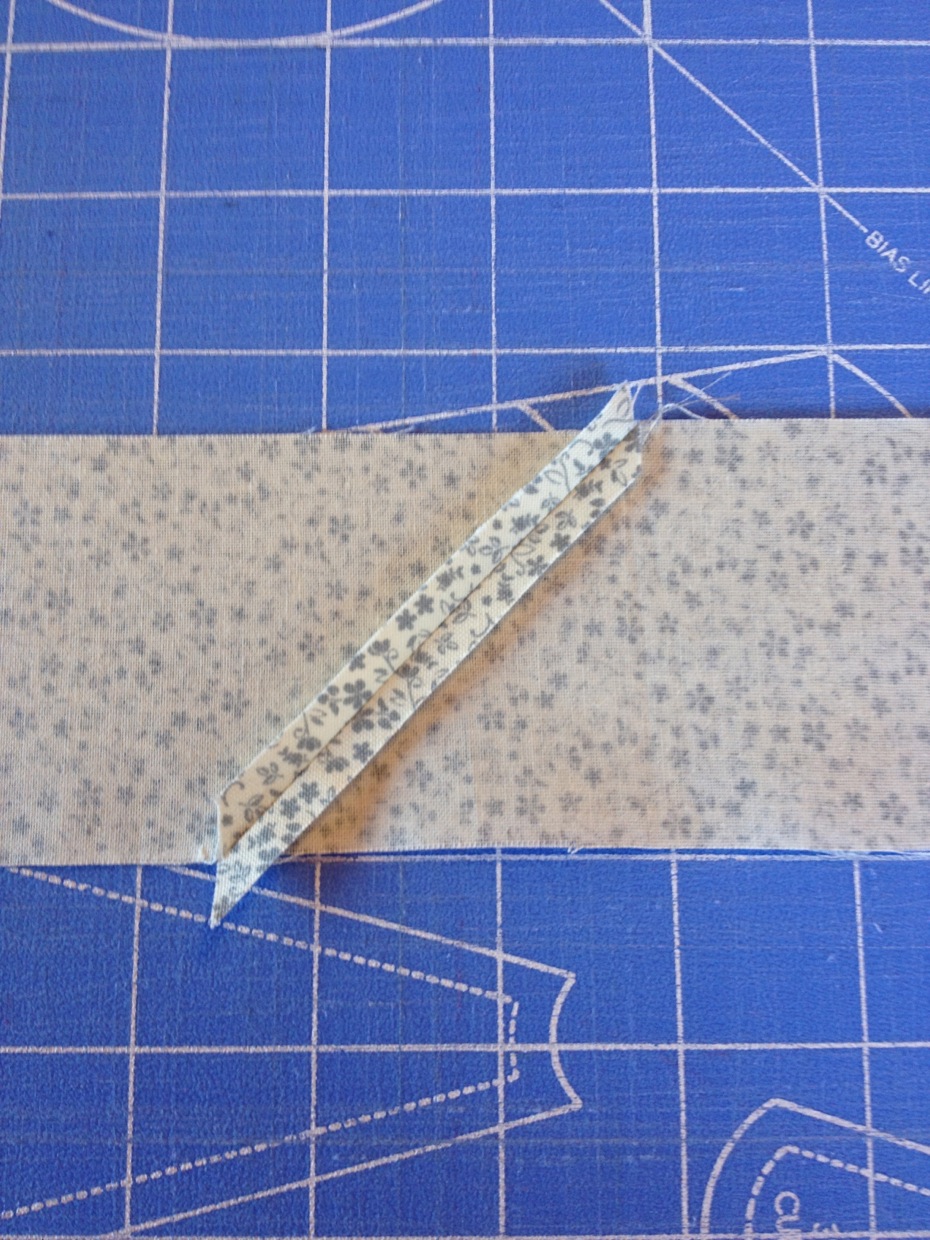
7.Trim your “dog ears” off the edges.

8. Now….to the ironing board. Fold the binding strip in half and press closed. Working your way down the entire strip.

Your binding is ready! Isn’t it cute?

Sassy Binding….if I don’t say so myself:)
***CHECK IN TOMORROW FOR A FREE ,FABRIC, FRIDAY GIVE-A-WAY!!!***


1. How is it wrapped onto the spool?
Is your thread cross-wound, loaded onto the spool in a criss-cross pattern forming and x around the spool, or is it stacked, loaded parallel and stacking on top of itself?
2. What is your thread made of?
Cotton, polyester, rayon, nylon, metallic, silk, or wool?
3. How thick is your thread?
30wt., 40wt., or 50wt.?
Is your mind spinning, did you not know thread was this complicated? Well, it really isn’t. Let’s address these one at a time…..
1. How your thread is loaded tells you how it should stand on your machine. If it is cross-wound(right in the pic below), it should be horizontal with a spool cap to keep it in place. If it is stacked(left in the pic below), it should sit vertically. If not in the right direction it doesn’t come off the spool properly and can get tangled or you may even notice some tension issues. If your machine will not hold the spool both directions, there are thread stands to help you out. Thread stands are also used for those large cones of thread.

2. What your thread is made of will depend on your project and different size needles may be required. Here is the 411 on some common types.
Cotton-natural, soft, durable, not as strong as polyester, and a low shiny factor:)(sheen).
Polyester-strong, durable, colorfast, various finishes(shiny factors).
Rayon-mostly used for embroidery, cheaper, less durable, not colorfast, high shiny factor.
Monofilament-invisible,strong(but brittle over time), not colorfast(yellows over time),not heat resistant.
Metallic-not really thread(plastic cut into strips), need special needle, can break easily.
3. How thick your thread is, or the weight of your thread, is not that complicated either.
• 30wt.-thicker, very common.
• 40wt.-finer.
• 50wt.-very fine, great for making your stitches blend, great in your bobbin, too!
Tips:
Monofilament and Metallic like to fall off the spool, so a net that fits over the spool keeps it in place and helps with tension. I bet you didn’t even know what that netty thing was for:)
Quality, quality, quality! Cheap thread is linty and will get inside your machine and drive you nuts with machine troubles. A not so expensive thread I love is Gutermann brand, and with a Joann’s coupon or a 50% sale, I like to stock up.
Grey is an amazing neutral color for thread, Light or dark grey blends with most anything.
Don’t listen to rumors! Experiment, try lots and see what you and your machine love♥.
Here my picks for good thread, give ’em a click to check ’em out:


Here is a project easy enough for any newbie on the block! All you need to get started is a charm pack that you are in love with and 1 yard of a coordinating fabric for the border. Check out the pattern for all the details to finish the quilt.
For my Baby Charm Quilt, I used a charm pack called Lily & Will II by Bunny Hill Designs for Moda Fabrics:


Charm packs are great for easy quick projects. They are pre-cut 5″ squares and the fabrics are already coordinated, so you can get right to the fun part….making your project. Check out our Sassy Deals for great sites to buy charm packs…WARNING!!! Pre-cuts are addictive and you may have to buy every single one you like…..so give yourself a budget:)
One charm pack is good for a baby quilt this size, you will need several to make larger projects. Check out my Helpful Charts page to help you know how many.
So, I laid out my charms how I liked them, put them together, added my borders and Voila! Check out my Strawberry Jam posts for help with assembling blocks, rows and borders.
This will charm any baby and their mama:)


Okay, let’s wrap this thing up and finish this quilt top!
The center blocks of your top are done and put together in rows, all we need now is to add our borders and the top is D-O-N-E. The problem with borders is, the pattern tells us how to cut them the perfect size, and well… those borders…..only fit on perfect quilts. Your quilts can come out a little over or undersized. All those seams combined with the stretchiness(is this a word???) of fabric can lead to some distortion in your finished product. This is the method I use to add my borders so that they are perfect every time;)
After I construct my border strips(so they are long enough), I don’t make the second set of cuts to the exact size. This leaves them a little over-sized. Next, I fold my border in half and rub my fingernail over the fold to make a crease in the fabric; marking the mid-point of my border. Because the center of our top is 6×6 blocks, I know my mid-point on the top is the seam between the third and fourth block. Line up your crease with the seam and pin together, make sure right sides of fabric are facing each other. Did I mention we are starting with the side borders?

Working on a flat surface, like your table, continue to pin your border along the quilt top. About one pin at every seam line, this is where it wants to move the most. The trick here is not to stretch the border or the quilt top. All those seams have a lot of give…so take it easy! If you pin too tightly, when you take out the pins it will relax and be wavy. If you pin too loosely, you will have puckers or folds along border. Just let the fabrics lay naturally together and you’ll be fine:)

Go ahead and pin both sides, and then sew ’em up! Now take it to the ironing board and press open your border. Be gentle, but make sure to press your border all the way open. Next, I lay it on my cutting mat and make sure everything looks square and then trim the excess with my ruler. Do this on both ends of each border.

Time for the top and bottom borders and…..your oh, so, sassy, Strawberry Jammy quilt top is done!
Here is mine:

Hope you like it:) Stay tuned for the finished quilt!
